Amazon Launchpad hub to find companies that share your passion about building great products and get the services you need, at all stages of your product life cycle.

Application Note below on how to connect to AWS using eS-Wifi modules and IWIN AT commands.
Amazon AWS (MQTT) IoT Cloud Setup :
Wi-Fi Connectivity Python Demo Example
1 Scope
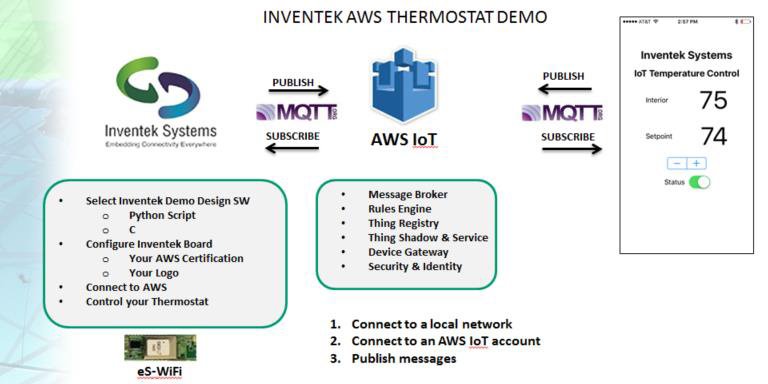
The eS-WiFi serial to Wi-Fi module family simplifies cloud connectivity by using the Inventek, IWIN AT Command Set to connect a device to the AWS IoT cloud. This provides a detail description of how to:
- Setup an AWS account
- Modify the Inventek firmware to connect to your AWS account
- Run either a “C” project or Python to connect to the AWS cloud
- Control a thermistor and some GPIO push buttons
2 AWS IoT Description
The Amazon AWS IoT service enables secure, bidirectional communication between IoT devices, sometimes referred to as Internet-connected things or simply things (sensors, actuators, devices, applications, etc.), and the cloud over MQTT.
Things are authenticated using AWS IoT service-provided X.509 certificates. Once a certificate is provisioned and activated it can be installed on a thing. The thing will then use that certificate to send all requests to AWS MQTT. Authorization is controlled by JSON policy files that allow you to specify which resources a specific device (certificate) may access. Inventek’s eS-WiFi Demo program incorporates a firmware customization feature to program the required certificated on a device.
3 AWS IoT Setup
For complete information on getting started using the AWS IoT service, see:
http://us-west-2.console.aws.amazon.com/iot/home
The following steps summarize what a user should do to get started using the AWS IoT service with a device:
- Go to the AWS IoT service by clicking on or entering http://aws.amazon.com/iot/ in a browser.
- Create an AWS account by clicking on “Get started with AWS IoT“
- Sign in to the AWS Management Console by clicking on or navigating to http://aws.amazon.com/console/ and then clicking on Sign in to the AWS Console.
- In the webpage that opens, select US East (N. Virginia) as the server region for management console use during the AWS IoT beta:
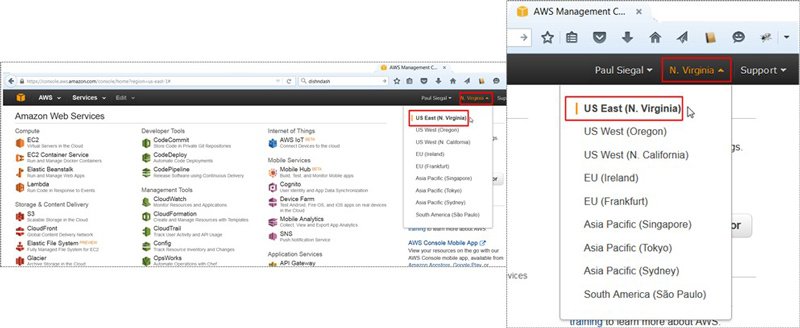
5. In the Internet of Things column, click AWS IoT to start using the management console

6. In the webpage that opens, click Get started:
7. In the AWS IoT management console webpage:
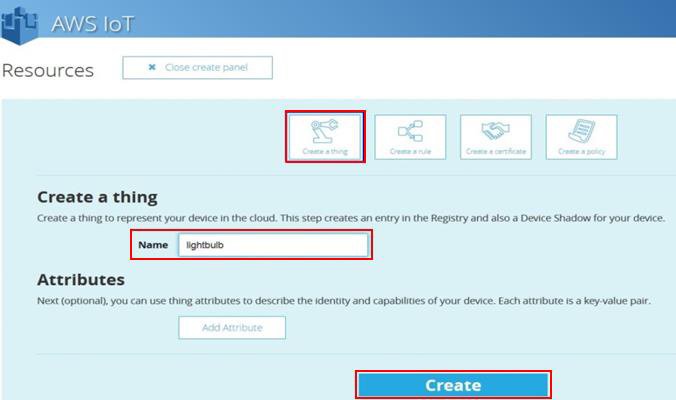
- Click Create a resource.
- Click Create a thing, enter the name of the thing (for example, lightbulb)
- Then click Create.
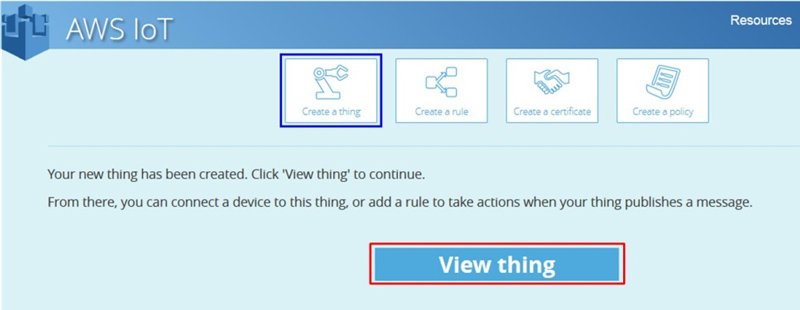
8. Click View thing in order to connect a device.
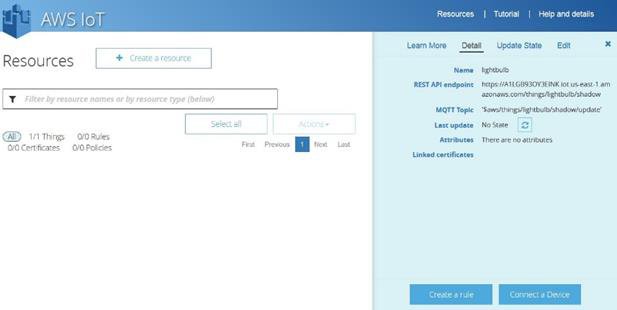
9. Click Connect a Device.
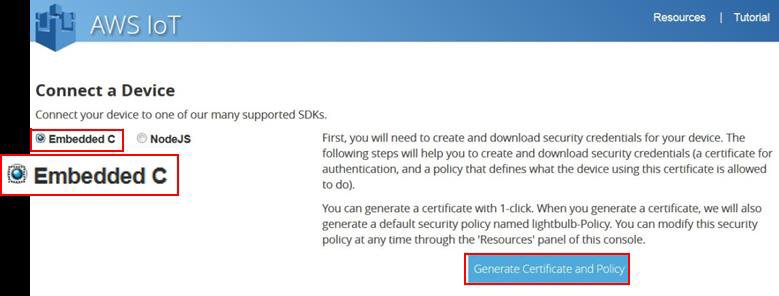
10. Click Embedded C as the supported SDK and then click Generate Certificate and Policy.
Sequentially click on the Download Public Key, Download Private Key, and Download Certificate links and for each click Save File, OK, navigate to the directory where the credentials should be stored, and then click Save. Also, Download the Root CA:
-
- Download the Root CA cert here: http://www.symantec.com/content/en/us/enterprise/verisign/roots/VeriSign-Class%203-Public-Primary-Certification-Authority-G5.pem
- Save it with the .pem file extension
4 eS-WiFi Module Setup
After you have completed your AWS account setup, you need to modify the Inventek firmware to add your particular AWS account credentials. You need the following files that you can download from the Inventek website:
- es-Wifi Demo Program (PC program)
- ISM43362 Firmware image 3.5.0.2 or later
- or ISM43340 Firmware image 3.5.0.2 or later
4.1 Creating the AWS eS-WiFi Firmware Image for your account
- Create a folder on your PC with the following files:
- ISM43362_M3G_L44_C3.5.2.0.bin (beta)
- RootCA. pem
- AWS-Certificate.crt
- AWS-Private.pem.key (Downloaded in Step F above)
- Open the eS-WiFi Demo Program to create the Image. Select
- AWS Certs
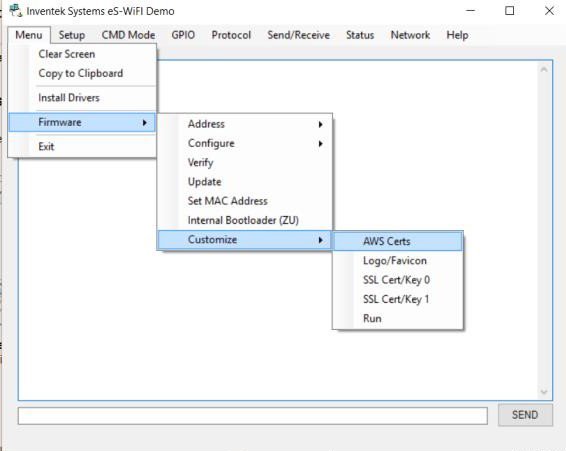
Then Selects Menu—>Firmware —>Customize —> AWS Certs —> Run
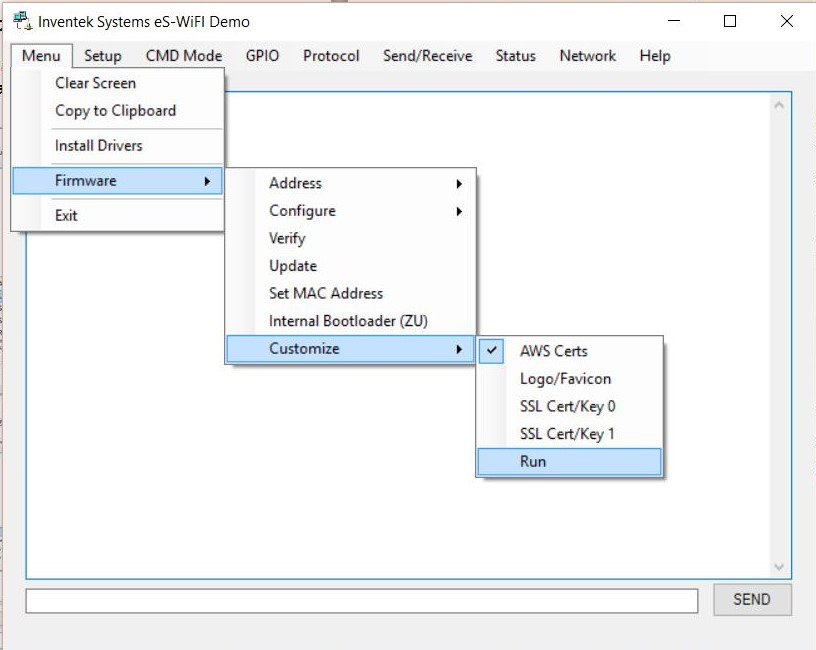
Go to the Folder in from Step 1 and select the files in the following order:
- Firmware
- Root CA
- Certificate
- Private Key
Note: You can also customize your logo/Fav icon. Needs to be less than 4K in size
The eS-WiFi demo program will automatically create a new firmware image that you can use to re-flash your evaluation board.
- Plug your evb into the PC USB port. (see user manual if you have not already installed the FTDi drivers)
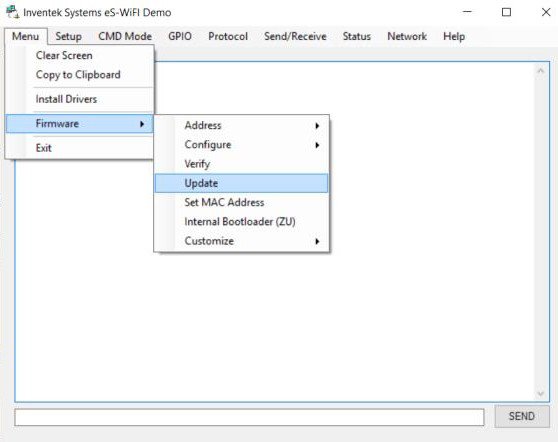
- Select Menu—> Firmware —> Update to program the new firmware Image
- Point to the newly created *.bin in your AWS folder
- Your module is now updated with your firmware that is setup to connect to your AWS account
Python Script to Connect to AWS using IWIN AT Commands
Now that you have an AWS account and the eS-WiFi module has been updated with your account credentials, this section shows you how to connect to the AWS cloud using either a Python Script or “C” code”.
5 AWS Python Thermostat Script
Download the IWIN AWS Thermostat Demo Python script to your PC.
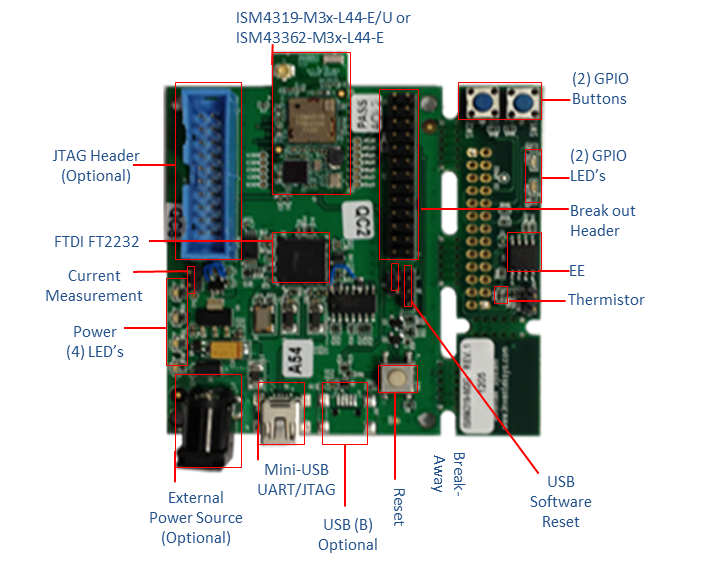
On the Inventek ISM43362 or ISM43340 evaluation boards there is a Thermistor and two blue GPIO Buttons that are used by the Python script. The demo will connect you to the Amazon AWS cloud, and present the temperature as well as your last set points for the Thermostat. Using AWS shadow you can see temperature and current thermostat settings. For real time viewing of data on the AWS cloud use the MQTT client detailed below.
- Thermistor = Temperature on AWS
- Button #1: Sets Thermostat upper limit
- Button # 2: Sets Thermostat Lower limit
- Press #1 & #2 : Program exits
Locate the following section of the code in the Python script and make the changes to configure your network and AWS certificates:
#Setup———————————————————————-
#Network Configuration Method
useSoftAP = 0 #Join using, 0 = Cx commands, 1 = A0 (SoftAP)
#Local Network Setup
SSID = “ssid” #SSID of AP
PSWD = “password” #Password of AP
SEC=”4″ #Security type of AP: 0-Open, 1-WEP, 2-WPA, 3-WPA2-AES, 4-WPA2-Mixed
DHCP=”1″ #Get IP address for DHCP, 0-No, 1-Yes
#Socket/Protocol Setup
SOCKET = “0” #Select Socket 0-3
PROTOCOL=”4″ #TCP=0, UDP=1, UDP-Lite=2 TCP-SSL=3(Hercules doesn’t support), 4-MQTT
#MQTT Setup
PBTOPIC=”$aws/things/<Thing_name>/shadow/update” #Publish topic
SBTOPIC=”$aws/things/<Thing_name>/shadow/update/accepted” #Subscribe topic
MQTTMODE = “2” #Mode 0-None, 1-User Name/Password, 2-Certificates(AWS IoT)
#TCP Keep-Alive
TTI = 3000 #Time-To-Idle (ms)
#AWS IoT
deviceID = “<AWS_ID>” #AWS Device Id
remoteURL = deviceID + “.iot.us-east-1.amazonaws.com” #AWS Location URL
#Client Mode
useDNS = 1
remoteIP = “192.168.1.48” #Remote Server IP address (use 192.168.10.100 with AD Direct Mode)
remotePort = “8883” #Remote TCP port
#—————————————————————————
- Locate the “Local Network Setup”
- Change “ssid” to the name of your Access Point
- Change “password” to the password of your Access Point
- Locate the “MQTT Setup”
- In the PBTOPIC change “<Thing_name>” to the name of your thing
- In the SBTTOPIC change “<Thing_name>” to the name of your thing
- Locate the “AWS IoT”
- Change “<AWS_ID>” to your AWS device ID. This is located in the Rest API endpoint :HTTPS://A3SXXXXXXXXXXX
- Change the URL location to match the location of where you created your thing ex.”.iot.us-east-1.amazonaws.com” to “.iot.us-west-1.amazonaws.com”
- Locate the “Client Mode”
- Check the remote Port matches the port for your thing
Note: On the AWS IoT Webpage, Click on the desired thing (i.e. Temp), Then Click the Details tab for URL and Topic Information. The topic information in s
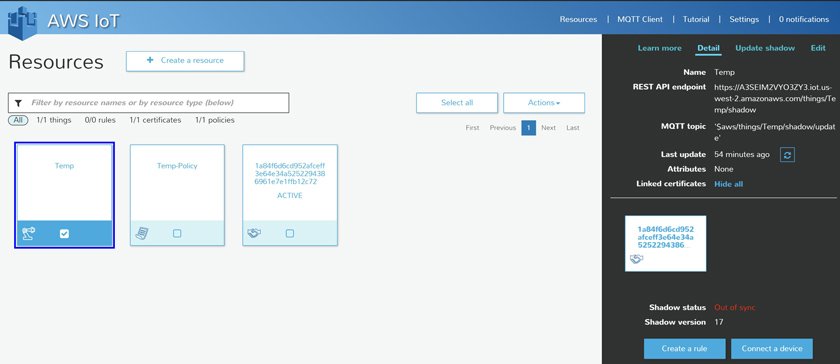
At this point you have completed your basic connection to the Amazon AWS cloud. You have connected your Thermostat to the Amazon cloud and published some basic GPIO controls as well as Temperature. The next step is to work on creating your controls and database using the AWS tools available.
To view your AWS cloud connected product real time, you can use the MQTT.fx tool on your PC as detailed below:
6 Verify MQTT Subscribe and Publish
The steps in this section show you how to verify you can use your certificate to communicate with AWS IoT over MQTT. You will use an MQTT client to subscribe and publish to an MQTT topic.
This guide assumes you are using MQTT.fx, an MQTT client written in Java based on Eclipse Paho. You can install it from Download MQTT.fx
6.1 Configure MQTT.fx
To configure MQTT.fx, open the app and choose the gear icon at the top of the page.
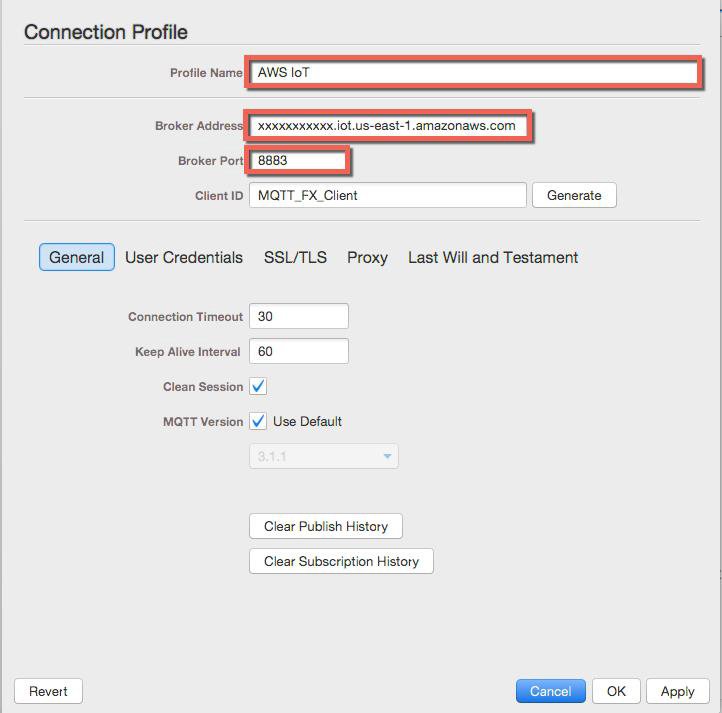
Type a profile name. In Broker Address, type your account-specific AWS IoT endpoint URL. Use the describe-endpoint CLI command to find your account-specific AWS IoT endpoint URL. In Broker Port, type 8883, as shown here:
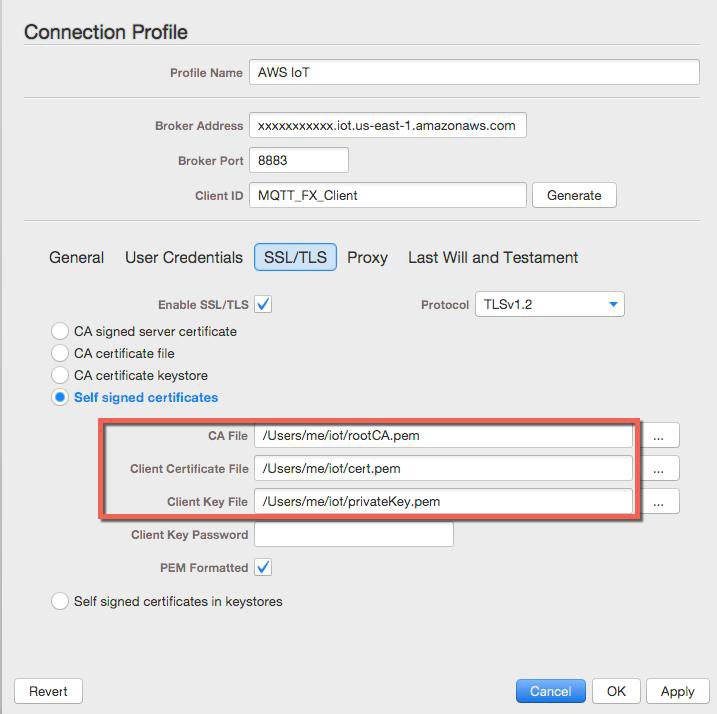
Choose the SSL/TLS button to view the SSL/TLS settings page. Type the paths to your private key, certificate, and root CA certificate as shown here:

Choose the OK to save your settings, and then choose Connect to connect to AWS IoT.
6.2 Subscribe to an MQTT Topic
Choose Subscribe and the Subscribe page will be displayed. Type my/topic in the text box, from the drop-down list, select QoS 0, and then choose Subscribe.

6.3 Publish to an MQTT Topic
Choose the Publish link and the publish page will be displayed. Type my/topic in the text box, and then type some text in the message area. From the drop-down box, choose QoS 0, and then choose Publish.

Choose Subscribe to display the Subscribe page. You should see the message has been received.