ADuCM360 ISM43340 CN0357 Demo Project
The ADuCM360_ISM43340_CN0357 is an IoT demo project for the EVAL-ADICUP360 base board and EVAL-CN0357-ARDZ, toxic gas (CO) sensor shield, created using GNU ARM Eclipse Plug-ins in Eclipse environment.
General Description
This project is a good example of how to use the EVAL-ADICUP360 board and Inventek System’s ISMART Wi-Fi Arduino shield in combination with various Arduino sensor shields to precisely measure and send sensor data to cloud. It expands the list of possible applications that can be done with the base board.
The ISMART is an Arduino compatible shield, that consists of an Inventek eS-WiFi module ISM43340 which leverages Broadcom’s BCM43341/0 Dual-Band (2.4GHz / 5GHz) 802.11 a/b/g/n MAC/Baseband/Radio with Integrated Bluetooth 4.0. The ISM43340 module includes an ST microcontroller Cortex M4 STM32F405, with an integrated TCP/IP stack. It requires no operating system and can be controlled with Inventek’s AT Command set (IWIN) or with Broadcom’s WICEDTM SDK.
This project also uses the EVAL-CN0357-ARDZ shield which is a single-supply, low noise, portable gas detector circuit using an electrochemical sensor.
The EVAL-CN0357-ARDZ shield circuit provides a potentiostatic circuit for biasing the electrochemical sensor, along with a programmable TIA and 16-bit Sigma-Delta ADC. The TIA converts the small currents passing in the sensor to a voltage that can be read by the ADC. The 16-bit ADC value is received via SPI interface of the EVAL-ADICUP360 board, where the gas concentration is computed. The ADuCM360_ISM43340_CN0357 application configures the necessary components, processes ADC output value and make all necessary conversions in order to provide the gas concentration in Parts Per Million (PPM). This gas concentration value (ppm) is then sent to cloud using the HTTP REST API. In other words, the ISMART Wi-Fi module acts as REST Client that sends gas concentration computed by EVAL-ADICUP360 to the cloud server.
At the start of the project, the software computes the necessary parameters and configures the digital rheostat(AD5270) of the TIA. The required parameters are the sensor sensitivity and sensor range. These can be modified by changing the values of the constants SENSOR_SENSITIVITY and SENSOR_RANGE found in the CN0357.h header file of the project. See the “Project Structure” section for more details.
For configuring the ISMART Wi-Fi shield, user must enter local Wi-Fi network information such as SSID, password and network security type in the User_Settings.h header file of the project. User is also expected to enter Cloud Instance information such as instance URL, application key and Thing Name in the User_Settings.h file, so data from the sensor can be sent to cloud. See the “Project Structure” section for more details.
Once configuration is complete, the software remains in a loop and continuously reads data from the ADC, converts it into gas concentration(PPM) and sends it to the cloud every second.
Setting Up the Hardware
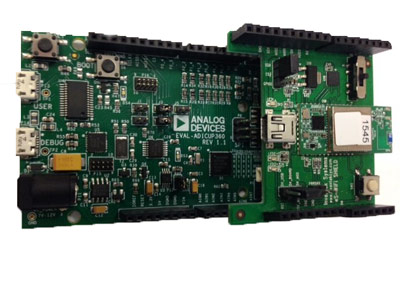
Connect the EVAL-CN0357-ARDZ to the Arduino connectors of the EVAL-ADICUP360 board.
In order to program the base board you need to use the DEBUG USB, and you will need to use the USER USB to communicate with the serial terminal program. The important jumpers and switches configurations are highlighted in red.

The ADuCM360_demo_cn0357 uses UART connection to ISMART shield via P0.6/P0.7 and SPI1 channel of the ADuCM360 to communicate with EVAL-CN0357-ARDZ board. To enable EVAL-ADICUP360 base board to communicate with ISM43340 WiFi shield via UART, set the ‘S2’ switch positions to connect P0.6 and P0.7 to the Arduino PWML (pin1 & pin2).
/* Insert Image */
Connect the ISMART shield into the Arduino connectors on the EVAL-CN0357-ARDZ sensor shield. Set the power jumper (J17) on the ISMART shield to receive power from base board. Set UART Switch (SW3) in position 3 (ie away from the module). This will allow the module to communicate with the base board via UART.
Obtaining the Source Code
We recommend not opening the project directly, but rather import it into Eclipse and make a local copy in your Eclipse workspace.
The source code and include files of the ADuCM360_ISM43340_CN0357 can be found on Github:
Importing the ADuCM360_ISM43340_CN0357 project
The necessary instructions on how to import the ADuCM360_ISM43340_CN0357 project from the projects examples in the Git repository, can be found in How to import existing projects from the GIT Repository page.
Debugging the ADuCM30_ISM43340_CN0357 project
-
A debug configuration must be set up for this project in order to have the possibility to program and to debug the ADuCM360_demo_cn0357 project. To do this, follow the instructions from Setting Up a Debug Configuration for the Project page.
-
Make sure the target board is connected to the computer (via DEBUG USB) and using the tool bar, navigate to the small Debug icon
 and select the debugging session you created. The application will be programmed and the program execution will stop at the beginning of the main() function.

-
Use step-by-step execution or directly run the program.
After completion of the above steps, the program will remain written into the system flash and it will run by default every time the board is powered up.
Project structure
The ADuCM360_ISM43340_CN0357 project uses ADuCM36x C/C++ Project structure.This project contains: system initialization part – disabling watchdog, setting system clock, enabling clock for peripherals; port configuration for SPI1, UART via P0.6/P0.7; SPI, UART read/write functions, AD7790 control, AD5270 control and gas concentration computation, ISM43340 control, cloud services executed via HTTP REST API calls.
In the src and include folders you will find the source and header files related to CN0357 software application. The Communication.c/h files contain SPI and UART specific data, the AD7790.c/h files contain the ADC control, the AD5270.c/h files contain the rheostat control, the ISM43340.c/h files contain Wi-Fi module control, the Services.c/h files contain cloud services, HTTP_REST_API.c/h files contain REST APICalls,and the CN0357.c/h files contain configurations and computations specific to the gas detector application.

In the appropriate header files you can configure next parameters:
-
Sensor Range – SENSOR_RANGE – maximum value of the gas conentration (ppm) that can be detected by the electrochemical gas sensor being used (CN0357.h).
#define SENSOR_RANGE 2000
-
Sensor Sensitivity – SENSOR_SENSITIVITY – sensitivity (nA/ppm) of the electrochemical sensor being used (CN0357.h).
#define SENSOR_SENSITIVITY 65
-
WLAN SSID – ssid – Local Wi-Fi Network SSID (User_Settings.h).
char ssid[] = "< Enter WLAN SSID >"
-
WLAN Password – password – Local Wi-Fi Network Password (User_Settings.h).
char password[] = "< Enter WLAN Password >"
-
WLAN Security Type – security_type – Local Wi-Fi Network Security Type (User_Settings.h).
char security_type[] = "< Enter WLAN Security Type >"
-
Thing Name – Thing_Name – Name of device in cloud instance (User_Settings.h).
char Thing_Name[] = "< Enter Thing Name >"
-
Application Key – app_key – Application Key associated with user account(User_Settings.h).
char app_key[] = "< Enter Application Key >"
The system folder contains system related files (try not to change these files):
-
ADuCM360 – contains low levels drivers for ADuCM360 microcontroller.
-
CMSIS – contains files related to ADuCM360 platform, such as: ADuCM360.h (registers definitions), system_ADuCM360.c/h (system clock), vectors_ADuCM360.c (interrupt vector table).
-
cortexm – contains files for system management (start-up, reset, exception handler).